Welcome
Photoshop is an incredibly powerful but also intimidating application. If you've wanted to start using Photoshop but didn't know where to start, you've found the right place.
Ready? Let's get started!
Click the arrows on the right hand side to look throughout the tutorial, and if you missed anything, simple click on the arrow on the left hand side to relearn the basics.

Beginner Guidelines
The video to the side is your lesson. It's short considering how much it covers and long considering it's on the internet. In the video, we take a look at every tool in the toolbar, your palettes on the right side of the screen, and what you'll find in the menus.
We're not going to take a look at every single tool but we are going to look at almost every one of them. While this overview will give you an idea of what each tool does, go find yourself a photo and start playing around with them.
Keyboard Shortcuts
The Various tools are :
Move Tool (Keyboard: V)
Marquee (Keyboard: M)
Lasso (Keyboard: L)
Magic Wand (Keyboard: W)
Crop Tool (Keyboard: C)
Eyedropper (Keyboard: I)
Healing Brush (Keyboard: J)
Paintbrush and Pencil (Keyboard: B)
Clone Stamp (Keyboard: S)
History Brush (Keyboard: Y)
Eraser Tool (Keyboard: E)
Paint Can and Gradient Tools (Keyboard: G)
Blur, Sharpen, and Smudge Tools (Keyboard: None)
Burn, Dodge, and Sponge Tools (Keyboard: O)
Pen Tool (Keyboard: P)
Type Tool (Keyboard: T)
Path Tool (Keyboard: A)
Shape Tool (Keyboard: U)
Hand Tool (Keyboard: H)
Zoom Tool (Keyboard: Z)

Selection
A selection isolates one or more parts of your image. By selecting specific areas, you can edit and apply effects and filters to portions of your image while leaving the unselected areas untouched.The easiest way to select pixels in your image is to use the quick selection tools. You can also select areas of a certain shape with the marquee tools or use the lasso tools to make a selection by tracing an element in your image. It's also possible to make selections based on a range of colors in an image. There are commands in the Select menu to select, deselect, or reselect all pixels.
In addition to pixels, vector data can be used to make selections. Use the pen or shape tools to produce precise outlines called paths. Paths can be converted to selections.Selections can be copied, moved, and pasted, or saved and stored in an alpha channel. Alpha channels store selections as grayscale images called masks. A mask is like the inverse of a selection: it covers the unselected part of the image and protects it from any editing or manipulations you apply. You can convert a stored mask back into a selection by loading the alpha channel into an image.
The Tools
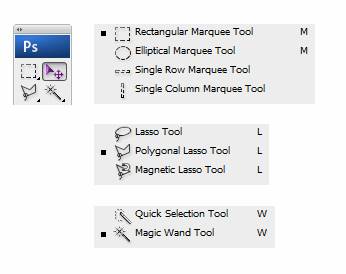
Each selection tool which is used in photoshop, is displayed in the image on the right. A short description of the most common selection tools are located below and explain what they do.
Lasso - The Lasso Tool is 100% freeform. Simply grab it and start drawing with your mouse or trackpad to make a selection. Obviously, the result is going to be rudimentary at best and even tends to be quite sloppy!
Quick Selection - The Quick Selection Tool is somewhat of a newcomer to the Photoshop selection tool family. However, it’s already proved itself to be far more useful than the Magic Wand Tool. This tool works like a brush: select your brush size, hardness, and spacing, then start painting to create a selection.
Magic Wand - Click on an area and Photoshop will attempt to select that area based on color and contrast. The results are rarely as good as you want them to be but if you have truly solid color fields then it can work decent.
Pen Tool - To be accurate, the tool is specifically for creating paths, which can then easily be converted to selections via a Command-Click.

Filters
Whether you're restoring or retouching a photo or going after a creative effect, once you've seen how much freedom smart filters give you, you'll be using them in your Photoshop work all the time
Any filter applied to a Smart Object is a Smart Filter. Smart Filters appear in the Layers panel below the Smart Object layer to which they are applied. Because you can adjust, remove, or hide Smart Filters, they are nondestructive.You can apply any Photoshop filter (that has been enabled to work with Smart Filters)—except for Extract, Liquify, Pattern Maker, and Vanishing Point—as a Smart Filter. In addition, you can apply Shadow/Highlight as Smart Filters.To work with Smart Filters, select a Smart Object layer, choose a filter, and then set filter options. After you apply a Smart Filter, you can adjust, reorder, or delete it.To expand or collapse the view of Smart Filters, click the triangle next to the Smart Filter icon, displayed to the right of the Smart Object layer in the Layers panel. (This technique also shows or hides Layer Style.) Or, choose Layers panel Options from the Layers panel menu, then select Expand New Effects in the dialog box.Use filter masks to selectively mask Smart Filter effects.
Various filters can be added to photos in Photoshop to enhance the mood and make pictures appear more dramatic. This can be seen in the video on the right.
The following filters support 16-bit/channel and 32-bit/channel documents:
All Blur filters (except for Lens Blur and Smart Blur)
All Distort filters
The Noise > Add Noise filter
All Pixelate filters
All Render filters (except for Lighting Effects)
All Sharpen filters (except for Sharpen Edges)
The following filters under Filter > Stylize:
Diffuse
Emboss
Trace Contour
All Video filters
All filters under
Filter > Other
Artistic filters
Filters from the Artistic submenu help you achieve painterly and artistic effects for a fine arts or commercial project. For example, use the Cutout filter for collages or typography. These filters replicate natural or traditional media effects. All the Artistic filters can be applied through the Filter Gallery.
Colored Pencil - Draws an image using colored pencils on a solid background. Edges are retained and given a rough crosshatch appearance; the solid background color shows through the smoother areas.
Cutout - Makes an image appear as though it were constructed from roughly cut pieces of colored paper. High-contrast images appear as if in silhouette, and colored images are built up from several layers of colored paper.
Dry Brush - Paints the edges of the image using a dry brush technique (between oil and watercolor). The filter simplifies an image by reducing its range of colors to areas of common color.
Film Grain - Applies an even pattern to the shadow tones and midtones. A smoother, more saturated pattern is added to the lighter areas. This filter is useful for eliminating banding in blends and visually unifying elements from various sources.
Fresco - Paints an image in a coarse style using short, rounded, and hastily applied daubs.
Neon Glow - Adds various types of glows to the objects in an image. This filter is useful for colorizing an image while softening its look. To select a glow color, click the glow box, and select a color from the Color Picker.
Paint Daubs - Lets you choose from various brush sizes (from 1 to 50) and types for a painterly effect. Brush types include Simple, Light Rough, Dark Rough, Wide Sharp, Wide Blurry, and Sparkle.
Palette Knife - Reduces detail in an image to give the effect of a thinly painted canvas that reveals the texture underneath.
Plastic Knife - Coats the image in shiny plastic, accentuating the surface detail.
Poster Edge - Reduces the number of colors in an image (posterizes it) according to the posterization option you set, and finds the edges of the image and draws black lines on them. Large broad areas have simple shading, and fine dark detail is distributed throughout the image.
Rough Pastels - Applies strokes of pastel chalk on a textured background. In areas of bright color, the chalk appears thick with little texture; in darker areas, the chalk appears scraped off to reveal the texture.
Smudge Stick - Softens an image using short diagonal strokes to smudge or smear the darker areas. Lighter areas become brighter and lose detail.
Sponge - Creates images with highly textured areas of contrasting color, simulating the effect of sponge painting
Underpainting - Paints the image on a textured background, and then paints the final image over it.
Watercolor - Paints the image in a watercolor style using a medium brush loaded with water and color, simplifying details. Where significant tonal changes occur at the edges, the filter saturates the color.
Audition Basics
So youʼve just recorded an audio file, and now itʼs time to edit. This is your quick guide to Adobe Audition.
Overall, you need to know how four basic things to produce an audio story:
1. How to set up / organize your workspace
2. How to cut and delete sound
3. How to raise or lower volume
4. How to mix to a WAV or MP3
The lengthy tutorial on the right should provide all the necessary information to bring an individual from a beginner to a pro.
The next slide will teach you how to simply edit and manipulate audio files in Adobe Audition.
Copying, cutting, pasting, and deleting audio
In the Waveform Editor, select the audio data you want to copy or cut. Or, to copy or cut the entire waveform, deselect all audio data.
Choose one of the following:
Edit > Copy to copy audio data to the clipboard.
Edit > Copy To New to copy and paste the audio data into a newly created file.
Edit > Cut to remove audio data from the current waveform and copy it to the clipboard.
Pasting audio data
Do either of the following:
To paste audio into the current file, place the current-time indicator where you want to insert the audio or select existing audio you want to replace. Then choose Edit > Paste.
To paste audio data into a new file, choose Edit > Paste To New. The new file automatically inherits the sample type (rate and bit depth) from the original clipboard material.
Deleting or cropping audio
Do one of the following:
Select audio you want to delete, and choose Edit > Delete.
Select audio you want to keep, and choose Edit > Crop. (Unwanted audio at the beginning and end of the file is removed.)
Thank you! Your submission has been received!
Oops! Something went wrong while submitting the form